Are you dealing with a damaged axle or want to upgrade the trailer for a heavier load? It is crucial to understand how to replace a trailer axle and improve the durability of your trailer.
Replacing a trailer axle might seem complex, but with the right tools and a straightforward approach, it can be done in a hassle-free way.
The trailer axle might not be the highlight of the whole setup, but it plays a vital role. The axles deal with the weight of your load, absorb shock, and ensure the trailer runs smoothly and safely.
If neglected, it can lead to severe problems, including poor handling of the trailer to total failure.
In this blog, we will explore a detailed guide to replace the trailer and discuss the best tips to choose the right axle for your trailer. We will also discuss essential tips for proper trailer axle setup and the significance of professional installation.
Start reading!
Types of Trailer Axles
While considering towing, one of the most crucial elements of a trailer is its axle. It helps stabilize the trailer when it is in motion and carrying its weight. The trailer axle determines the maximum load capacity of the trailer.
There are different types of trailer axles, and each type has distinct features and specifications. These aspects make it suitable for other trailers.
Let us look into the different types of trailer axles:
1. Straight Axle
A straight axle is a well-known and simple axle configuration. They are used in utility trailers as they provide ground clearance and are much affordable.
They are ideal for routine towing when you are not looking for specialized features like a low deck height.
The straightforward design of straight axles allows for easier repairs and replacements. It makes them an excellent option for most trailer owners.
2. Drop Axle
A drop axle, also known as a dropped axle, features a curve in the center of the frame, bringing the trailer deck near to the ground. This lower deck location is simple to load and unload.
It is especially suitable for heavy equipment, motorcycles, or other substantial items, as raising an upper deck can be challenging.
Generally, drop axles are measured by their drop height, ranging from 2 to 6 inches. They reduce ground clearance, which is helpful when quick loading is a concern.
3. Torsion Axle
Torsion axles use rubber cords or torsion bars inside the axle tube instead of leaf springs for suspension. This system offers several benefits, including a more comfortable and quieter ride, thanks to its independent wheel suspension.
It also requires reduced maintenance since there are no grease fittings and moving parts, and improved handling on uneven surfaces.
The Torsion axle operates independently; if one wheel encounters a pothole, it won’t affect the other wheel. They are a bit costly initially and may incur higher repair costs if they become damaged.
4. Spring Axle
The spring axles utilize conventional metal leaf springs positioned above or below the axle tube for their suspension system.
These are the most commonly used types for trailers, ideal for transporting heavier loads and challenging road conditions.
The leaf spring suspension is durable and has been utilized for many years. It is cost-effective in its maintenance and ensures smooth functioning. They are strong and can easily deal with heavy loads, making them an ideal option for severe applications.
Common Reasons for Trailer Axle Replacement
A wheel can be directly connected to an axle for its rotation. An axle can also be securely attached to the vehicle, enabling the wheels to revolve around the axle. For a standard vehicle, the axles must run smoothly for the car to move freely.
Neglecting proper axle maintenance can lead to the vehicle’s tires blowing out while you are on the road. For example, imagine travelling at a high speed and the axle fails; the outcome can be disastrous.
On a utility or gooseneck trailer, you generally transport essential goods. Now, imagine your trailer malfunctioning during a delivery or while driving on the highway.
Unloading that cargo and lifting your vehicle on the highway to fix an axle is a tedious process.
Regularly inspecting all your trailers, like gooseneck trailer axles, can prevent this laborious issue. Ensure one or more wheels don’t accidentally detach and pose a risk to others.
The common reasons for trailer axle replacement are –
1. Minor Damage:
Small problems, like minor bends or misalignments, can be fixed by an expert. Routine evaluations help you identify these problems before they degrade further.
2. Severe Damage:
If you find an axle badly bent or fractured, it will require replacement. A professional evaluation will help you understand whether repair and replacement are the ideal solution.
3. Age and Wear:
With time, axles wear out due to regular use and exposure to the elements. If your trailer’s axles are old and showing signs of wear, consider replacement to ensure continued safe operation.
4. Tire Wear & Uneven Treads
If your trailer accessories are experiencing abnormal wear or you observe a problem with their traction, the trailer axles could be to blame. Potholes and gravel roads are the biggest threats to your axle alignments. Misaligned axles lead to increased tire wear and potential damage to your suspension.
5. Rusty Axles
Rusty axles indicate that it might be time for a replacement. Axles with peeling rust or metal need to be replaced immediately. If left untreated, the rust can spread to other parts, weakening the axles. Rust impacts the amount of life you get out of the trailer axles.
6. Trailer Movement
Focus on the elevation of the trailer and its sensation while driving. If every bump or curve causes your cargo to fly around the trailer, it may lead to a suspension issue. The components of the suspension system on your trailer indicate a need for replacement.
Choosing the Right Axle for Your Trailer
Axles are essential parts that directly affect a trailer’s ability to manage loads, sustain balance, and operate on the road.
Whether transporting heavy equipment, moving construction materials, or towing a camper, you must choose the right axle. It helps ensure your trailer handles its load securely, adhering to necessary legal road regulations.
Here are the tips to choose the right trailer axle –
Tip 1: Understand the Basics of Trailer Axles
A trailer axle is an essential structural part that links the trailer’s wheels to its frame, supplying the required support for the load’s weight.
It is essential for maintaining effective load distribution, stability, and facilitating movement. The axle transfers the weight of the load to the wheels, enabling the trailer to stay balanced during towing.
Tip 2: Consider the Load Capacity
A key factor to consider when choosing a trailer axle is its load capacity. The design and material of the axle help determine the maximum weight it can reliably hold. Exceeding the axle’s load capacity causes tire deterioration and reduced maneuverability.
Adding an axle to a trailer involves increasing the number of axles on the trailer. It helps distribute the load’s weight more evenly, potentially increasing the trailer’s weight capacity.
Ensure you determine the total weight of the load, including the trailer, and select an axle setup that can support it.
Tip 3: Match the Axle Type to Your Trailer’s Use
Trailers differ from one another, and the specific type of trailer will influence the optimal axle setup for your requirements.
Flatbed Trailers
These adaptable trailers frequently utilize tandem or tri-axle setups. It is used to transport construction materials, vehicles, or equipment.
Enclosed Trailers
A single or tandem trailer axle positioning is considered sufficient for transporting smaller or delicate cargo.
Utility Trailers
Small utility trailers intended for gardening or transporting items use a single axle for light to moderate loads.
Specialized Trailers
Some trailers may require more than two axles for additional support and stability. It is effective for large machinery or oversized shipments.
Tips 4: Understand Safety Requirements and Regulations
Based on your location, there might be particular road safety rules that dictate axle configurations. These guidelines will include axle weight restrictions and braking standards.
It also involves the maximum number of axles permitted for specific trailer types. Understanding these regulations is crucial to prevent penalties and to keep your trailer in a safe operating condition.
Tip 5: Cost and Maintenance Considerations
Selecting an axle setup that includes additional axles increases the expense of your trailer. You must consider the cost of a single vs a dual axle trailer as per your requirements.
Ranging from towing capacity to fuel efficiency and maneuverability to safety, the cost varies accordingly.
Although a single-axle configuration is the most affordable choice, Tandem and tri-axle trailers are more costly because of the additional materials and complexity required in their manufacturing.
The extra investment offers enhanced long-term advantages regarding load capacity and stability.
How to Replace a Trailer Axle: Detailed Step-by-Step Guide
Whether you are inexperienced with trailer maintenance or want to take the correct approach, this guide will help you understand the complete trailer axles replacement process.
From organizing to securely installing the new axle, make sure to approach the task with ease.
Let us understand how to install a trailer axle or replace them according to your requirements –
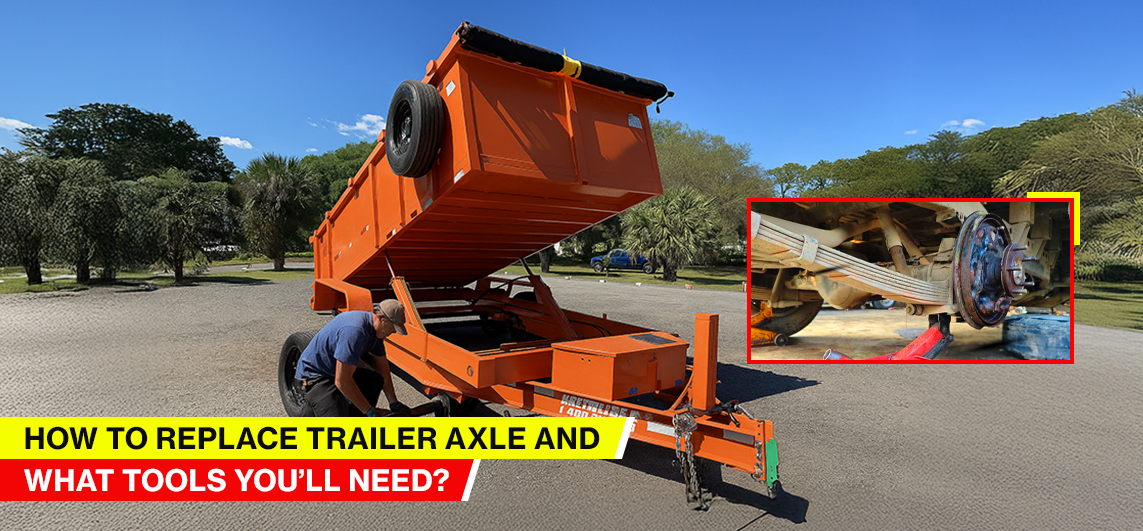
Step 1: Jack Up The Trailer
Utilize a floor jack to lift the trailer by the frame easily. You must adhere to the specifications provided by the trailer manufacturer. While upgrading a trailer axle, ensure the trailer is secured with jack stands.
Step 2: Remove The Wheels
With an impact driver, breaker bar, or wrench, you can remove all the lug nuts from the wheel. Then, take the wheel off the hub. If your trailer has accumulated rust, this step needs more effort. Remove the wheels from each side of the trailer and set them aside.
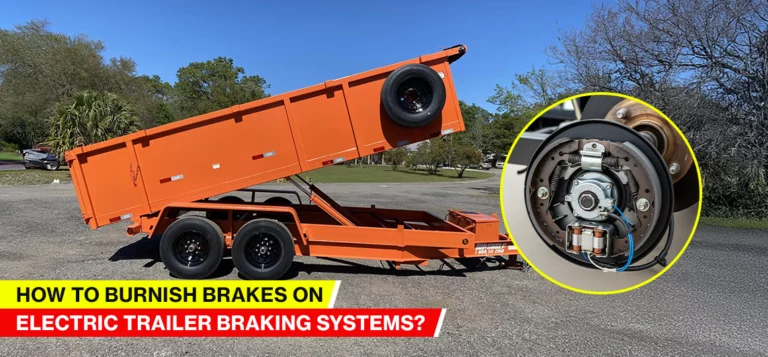
Step 3: Cut the Power And Ground Wires
If your axle has electric trailer brakes, locate the power wire and the ground wire. These wires must be cut to prevent snagging during the removal of the old axle. If required, the professionals will reattach them to the new axle later.
Step 4: Jack up The Axle
Utilizing your floor jack, you can lift the axle beam at its midpoint. Avoid causing additional damage to the axle. Lift the axle sufficiently to relieve pressure on the shackles at the ends. Then, position the jack stands beneath the axle beam for support.
Step 5: Remove the Shackles
Once the axle is adequately supported, you can begin to take off the bolts holding the shackles to the leaf springs. After the nuts are removed, the bolts may need to be tapped out of their positions. It can be done using a mallet and a punch. After taking off the shackles, you must check them for signs of wear or harm.
Step 6: Remove the Hanger Bolts
Use the same method as mentioned above and remove the shoulder bolts. These bolts fasten the leaf springs to the hangers. Make sure to check and replace the parts if required.
Step 7: Lower the Axle
Once all attaching bolts are removed, you can use your floor jack to lift the axle at its center point again.
After it lifts off the jacks, pull them out. Next, lower the axle to the ground and pull it out from under the trailer.
Step 8: Raise the New Axle Into Position
Place the new axle assembly under the trailer. Then, gently place it on its midpoint on the floor jack. Ensure that the axle is oriented the right way. The ID tag must be oriented toward the rear of the trailer.
Then, gradually lift it into the correct position, making any necessary adjustments. Make sure to align it with the mounting points. Finally, once the axle is appropriately aligned, secure it with the jack stands.
Step 9: Reattach the Leaf Springs
Using the hanger bolts, reconnect the leaf springs to the trailer. You might need to make slight modifications to align the eyelets of your leaf springs with the openings.
First, place the bolts into the hanger brackets, and then reattach the shackles. You must ensure both sides of the trailer are secured. Applying grease to the bolts during reinstallation is also advised.
Some bolts feature a grease zerk, allowing application with a grease gun. Standard bolts require grease to be applied directly on the shaft before installation. Just finger-tighten until every piece of hardware has been swapped out.
Step 10: Torque the Hardware To The Correct Valves
Use a torque wrench to secure the shackle bolts to 30-50 foot-pounds. Then, tighten the hanger bolts. You will need to use a wrench on the bolt head while applying the torque wrench to the nut.
Step 11: Reconnect Your Trailer Brake Wires
Once the axle assembly is completely secured, you can proceed to rewire the trailer brakes. First, connect the power wires using a scotch lock. Then, join the ground wires together utilizing the same technique.
Step 12: Reinstall the Wheels
Place each wheel onto its designated axle hub, and tighten the lug nuts. Then, use your impact wrench to tighten the lugs, forming a star-shaped pattern. Lift the trailer frame again and ensure proper torqueing.
Then, lower it until the tires are well secured on the ground. It will prevent the wheels from turning while you tighten the nuts to the proper specifications. You must make sure to consult your owner’s manual for the correct torque specifications.
Tips for Proper Trailer Axle Setup
Proper trailer axle setup is crucial for safe and stable towing. Key aspects include ensuring correct axle alignment, selecting the right axle for the trailer’s weight capacity, and properly installing the springs and U-bolts.
Regular inspections of the axle, tires, and suspension are also essential to identify and address any issues that could affect performance and safety.
1. Capacity:
Select an axle that meets the appropriate weight capacity for your trailer. You must consider the Gross Vehicle Weight Rating (GVWR) while setting up the trailer axle. It includes the trailer’s weight, all the cargo, passengers, fluids, and any accessories or equipment.
2. Length:
Determine the spacing between the attachment points on your trailer’s frame. You must choose an axle that matches the suitable length for seamless setup.
3. Perpendicular Position:
Make sure the axle is positioned at a right angle to the trailer frame. It will help keep the wheel alignment accurate.
4. Secure Mounting:
Utilize U-bolts and tighten them according to the manufacturer’s guidelines. You must maintain uniform pressure and a stable connection for a secure fit.
5. Wheel Alignment and Tire Wear:
- Alignment: Once the axle is secured, fit the wheels and tires.
- Parallelism: Check the distance between the front and rear tires to confirm they are parallel.
- Adjustment: You can modify the axle location to ensure parallelism and avoid uneven tire wear.
6. Safety and Maintenance:
- Brakes and Wiring: Reconnect the brakes and wiring, and you must check their operation before towing.
- Torque Check: You must consistently check and adjust U-bolts according to the manufacturer’s guidelines.
- Bearing Maintenance: Lubricate wheel bearings and check the seals for signs of wear or tear.
- Regular Inspections: You must carry out a slow-speed test tow to assess stability and alignment. You must regularly inspect the U-bolts and suspension parts. Dump trailer maintenance helps maximize operational efficiency.
Trailer Axle Replacement Cost
The cost for replacing a trailer axle differs greatly. It depends on the axle type and its capacity. The outcome also varies depending on whether you handle the replacement yourself or hire professionals.
Here are the factors affecting cost:
1. Axle Type:
Various axle types, such as torsion axles and spring axles, have varying costs.
2. Capacity:
The higher capacity axles, ranging about 7000 lb, are generally more costly than the lower capacity axles, ranging about 3500 lb.
3. Brakes:
Axles equipped with brakes will cost more than those lacking them.
DIY vs. Professional Installation:
Installing the axle on your own will reduce labor expenses. But when it comes to mechanical expertise and effective use of equipment, you must hire professionals. It will involve more expenses and ensure an optimum outcome.
Parts and Labor:
The cost of the axle, including supplementary parts (such as springs, U-bolts, etc.), and expert installation labor, impacts the overall expense.
When to Consider a Professional Installation?
While replacing a trailer axle is achievable for many individuals, some situations call for professional expertise.
If you are not sure about any part of the process, lack the correct tools, or face unexpected challenges, opting for a professional installation can ensure your trailer’s safety and long-term reliability.
The following are examples of when to consult an expert:
1. Complicated suspension systems:
If the axle is a component of a sophisticated suspension system, it is essential to get an expert understanding and specific tools.
In such situations, you must consult a professional to guarantee the task is performed accurately and safely. It will help you avoid any harm to the axle or your trailer.
2. Significant rust or damage:
If there are indications of rust or damage to the structure of the current axle or trailer, you must hire the experts to replace it. A professional will seamlessly evaluate the level of harm and suggest the most effective steps to take. This will guarantee the durability and security of your trailer.
3. Lack of tools or experience:
If you don’t have the right tools or mechanical expertise, reaching out to the professionals is a wise choice.
They come with the skills and tools necessary to carry out the task efficiently and successfully. This may lower the chance of mistakes and guarantee a dependable and secure axle replacement.
Bringing Precision Parts and Ensuring Peak Performance with Top Shelf Trailers!
Replacing your trailer axles can be done in an affordable and fulfilling way if you adhere to the correct procedures. Following a proper guide on how to replace a trailer axle will help you prevent typical errors.
Do you want to upgrade your trailer with the best-quality axles? We at Top Shelf Trailers provide reliable and sturdy axles, installed without hassle.
Choosing a suitable trailer axle can be daunting. It is an essential choice that can influence your trailer’s safety and performance.
Understanding the various kinds of trailer axles, including their capacity, materials, brake styles, and maintenance needs, is essential. These factors help you in selecting the ideal option for your requirements.
You must hire professionals for effective replacement solutions. Proper installation and maintenance are crucial for your trailer’s appropriate and safe functioning. Focusing on your trailer axle can extend your trailer’s lifespan, minimize downtime, and prevent expensive repairs.
Whether you need a new trailer, repairs, or parts, reach out to us.