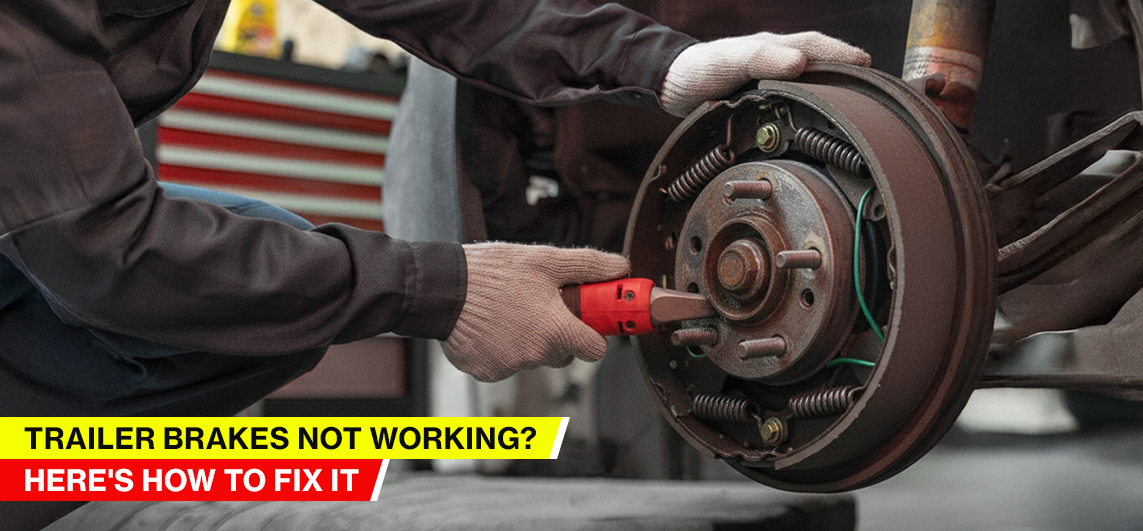
Before our inboxes overflow with queries like ‘Trailer Brakes not working – what to do?’, we might as well guide you a little.
Whether you are in the construction business or use a towing trailer for logistic purposes, trailer brake issues are common. Every trailer is equipped with one for on-road safety and is a critical component that must not malfunction. A dysfunctional trailer brake can lead to diminished stopping power, swaying, and pose a risk of accidents.
So, trailer brakes not working is a serious concern. And troubleshooting trailer brakes is rudimentary.
In this detailed read, let’s explore why your trailer brakes are not functioning and learn how to troubleshoot electric trailer brake issues. We will learn how trailer brakes work and cover all the electrical and mechanical aspects of fixing them.
Let’s begin!
How Trailer Brakes Work?
Before we get into how trailer brakes work, let’s learn what a trailer brake is.
A trailer brake, like any other braking system, is a stop mechanism installed on the trailer. It works in tandem with the towing vehicle. Meaning, if correctly installed, they activate when you hit the brakes on the towing vehicle, bringing the trailer to a halt.
Without trailer brakes, the towing vehicle must bear the entire weight of the trailer, including the load. This can be detrimental on the roads, especially when carrying bulk materials.
Hence, trailer brakes are a crucial component when hauling a trailer. Also, there are various kinds of trailer brakes, and here’s how they work –
1. Electric trailer brakes are the most common. An electrical signal from the tow vehicle activates the trailer brakes. They have the following component –
- A trailer brake controller installation process links the setup. It translates the driver’s braking actions and sends them to the trailer brakes.
- Each brake has a rotor or drum. When the controller sends a signal, an electromagnet within the system causes the brake pads to slow down the drum.
2. Surge trailer brakes work independently and rely on the momentum of the tow vehicle to engage the brakes against a brake actuator. Here is how it works –
- Hydraulic pressure generated by the trailer’s momentum compresses the actuator, creating pressure on the brake lines.
- The pressure is then transmitted to the trailer brakes, which proportionately slow down, creating a smooth braking experience. These do not require electricity.
3. Hydraulic trailer brakes are another solution that utilizes a hydraulic liquid to engage the brakes and bring the trailer to a halt. Here is how it performs –
- It relies on hydraulic pressure and a master cylinder connected to the towing vehicle’s brake pedal.
- When the brakes are applied, the hydraulic fluid in the cylinder is pressurized, allowing it to flow through the brake lines.
4. Air trailer brakes are commonly found in large commercial trailers and utilize compressed air to provide a powerful braking experience. They function like this –
- They utilize the compressed air stored within the trailer brake reservoirs. When the brake is applied, the air pressure is released, triggering the brake chamber to engage.
- The brake chamber converts the pressure into mechanical force to engage the pistons or diaphragms within it.
So, that’s how the varied trailer brakes work – each unique and designed to tackle varied cargo types.
Signs and Symptoms of Trailer Brake Issues
| Symptom | Likely Cause |
| Brakes not engaging at all | Electrical connection issue or faulty controller |
| Weak braking power | Worn brake pads/shoes or low hydraulic fluid |
| Brakes locking up | Incorrect brake controller setting |
| Brakes pull to one side | Uneven wear or faulty magnet |
Now that we have learned about the various types of trailer brakes, let’s address our primary concern: ‘trailer brakes not working’.
There’s always a reason why your trailer doesn’t come to a halt. Catching these issues early can save you from a significant incident and costly repairs.
So, here are some of the most common signs and symptoms that your trailer’s brakes might be having a bad day:
1. Lagging or Delayed Braking
You press the brake pedal in your tow vehicle, but it feels like the trailer is pushing you forward for a moment before it starts to slow down. The delay can be a sign of low fluid, air in the brake lines, or an issue with the brake controller’s sensitivity.
2. Squealing or Grinding Noises
Any unusual noise from any trailer part is a red flag, let alone a brake. Squealing sounds indicate worn-out brakes, and you should replace the trailer brake pads. A grinding noise, however, is a more serious symptom. It shows the pads are completely gone, and the metal backing plate is scraping against the brake rotor or drum. It can cause significant damage and is a safety hazard.
3. Excessive Smoke or Heat
After coming to a stop, especially after a descent, a small amount of heat is normal. However, if you see smoke or excessive heat coming from the trailer’s wheels, it’s a sign of a seized brake caliper or wheel cylinder. In other words, the brakes are constantly engaged, resulting in friction and heat buildup.
4. Poor Performance in Wet Conditions
If your trailer’s brakes feel weak or grabby when it’s raining, it may be a sign that water is entering the brake drums. It is a common issue with older or poorly maintained systems.
5. Uneven Braking
If you notice that one side of the trailer is braking more effectively than the other, it could be due to a seized caliper, a faulty brake line, or a misadjusted brake controller.
6. The Soft Brake Pedal
A soft pedal is a sensation you’ll feel in the tow vehicle, often related to the entire braking system, including the trailer. A spongy pedal could mean there’s air in the brake lines or a fluid leak somewhere in the system.
7. The Brake Warning Light is On
If your tow vehicle’s dash shows a trailer brake warning light, it’s not just a suggestion—it’s a severe alert. It could indicate a problem with the wiring, the brake controller, or the trailer’s brake system itself.
All of these are different yet distinct signs that trailer brakes are not working. Do not ignore them. Even a minor issue can quickly escalate into a dangerous situation on the road.
Common Causes of Trailer Brake Problems
| Cause | Description | How to Fix |
| Electrical Connection Issues | Loose or corroded wiring between tow vehicle & trailer | Inspect & clean connectors; replace damaged wires |
| Faulty Brake Controller | Malfunctioning controller inside the tow vehicle | Test controller; replace if needed |
| Worn Brake Pads/Shoes | Excessive wear reduces braking power | Replace brake pads or shoes |
| Weak or Broken Magnets | Magnets in electric drum brakes not engaging | Replace magnets |
| Hydraulic System Failure | Low fluid or leaks in hydraulic brakes | Refill or repair hydraulic system |
Now, each of these signs and symptoms has a root cause. Understanding it is the first step toward a safe and effective repair.
Faulty brakes do not necessarily have to be a result of a worn-out part. The issue lies in the complex system connecting your tow vehicle to the trailer.
Here are some of the most common roots that lead to trailer brake problems –
1. Electrical-Related Issues
For trailers with electric or electric-over-hydraulic brakes, the most frequent problems are often electrical in nature.
- A faulty connection between the tow vehicle and the trailer is a primary cause.
- The wiring harness can become corroded, especially in wet or salty environments, leading to an inconsistent signal or complete failure.
- Blown fuses in either the tow vehicle or the trailer’s electrical system can cause the brakes to malfunction.
- A malfunctioning brake controller in the tow vehicle may not be sending the correct amount of power to the trailer’s brakes.
All of these can result in brakes that are either too weak or, in some cases, constantly locked up.
2. Mechanical Failures
Mechanical issues are a leading cause of brake problems and often result from simple wear and tear.
- Worn-out brake pads or shoes are a common source. Over time, the friction material wears down, reducing the trailer’s ability to stop effectively.
- Seized calipers or wheel cylinders prevent the brakes from engaging or disengaging properly. It leads to the brakes constantly dragging, causing excessive heat and rapid wear.
- Damaged brake drums or rotors are a significant issue, causing a grinding noise and poor stopping power.
- Lastly, the brake magnets in electric brake systems can become weak or fail, preventing the brakes from being applied.
3. Hydraulic Brake Issues
Hydraulic brake systems, which are more common on boat trailers and older models, can suffer from their own set of problems.
- Low brake fluid is a dangerous yet straightforward issue; a leak in the lines or a worn master cylinder can cause a drop in fluid pressure, rendering the brakes ineffective.
- Air in the brake lines is another frequent problem. It often occurs due to a leak or improper bleeding of the system. Air is compressible, so when you press the brake pedal, you compress the air instead of building up pressure to engage the brakes.
- Finally, corroded or rusted brake lines can lead to leaks and a loss of pressure. It is particularly common on trailers that are frequently submerged in water, such as those used for boats or other watercraft.
Understanding these potential issues helps in effectively troubleshooting trailer brake problems and getting back on the road safely. Regular inspection of your trailer’s electrical, mechanical, and hydraulic components is crucial for preventing such issues before they happen.
Troubleshooting Electric Trailer Brake Problems
Electric brakes are the most common type of trailer brake system. While typically reliable, they can be tricky to diagnose when something goes wrong.
A systematic approach is the best way to pinpoint the issue and get your brakes working again.
Here’s a step-by-step guide to troubleshooting electric trailer brake problems on the fly –
1. Check the Connections
Check the electrical connection between your tow vehicle and the trailer. It is the number one cause of electric brake problems.
Unplug the connector and inspect it for corrosion, dirt, or bent pins. Use a small wire brush to clean any corrosion. Ensure the connector is firmly plugged in and the safety latches are securely in place.
Also, inspect the ground wire; a loose or corroded ground connection is a common concern and can cause intermittent or complete brake failure.
2. Test the Brake Controller
The brake controller in your tow vehicle is the brain of the system. If it is malfunctioning, so will the brakes.
Most modern brake controllers have a diagnostic display that can show error codes. Refer to your controller’s manual to understand the meaning of the codes.
You can also manually activate the brakes using the manual override lever on the controller. If the brakes engage when you use the manual override but not when you press the brake pedal, the issue could be with the pedal’s switch or the wiring to the controller.
3. Inspect the Trailer Wiring and Magnets
With the trailer disconnected, you can perform a basic inspection of the trailer’s brake system.
Trace the wiring:
Follow the wires from the trailer connector to each wheel. Look for any frayed wires, cuts, or damaged insulation. A short circuit in the wiring can cause the brakes to fail or to lock up unexpectedly.
Test the magnets:
The brake magnets activate the brakes inside the drum. A simple multimeter can be used to check their resistance. The reading should be within the range specified by the manufacturer. A reading of zero indicates a short circuit, while a very high reading suggests a broken wire or a faulty magnet.
Inspect the brake drums:
If possible, remove the brake drum to inspect it thoroughly. Inside, you can visually inspect the brake shoes and magnets for excessive wear or damage. You’ll also be able to see if any of the wires to the magnets are loose or broken.
4. Look for Worn-Out Components
Look for signs of mechanical wear. Worn-out brake shoes are a common problem. The friction material on the shoes should be at least a quarter of an inch thick.
Overheated trailer brakes often lead to grooves or scorch marks on the brake pads. If you see any of these signs, it is time to replace trailer brake pads.
By following these steps, you can methodically narrow down the problem, saving time and money. However, safety is paramount, so if you are unsure, it is always best to consult a professional mechanic.
How to Bleed Trailer Brakes?
If your trailer has a hydraulic braking system, a soft brake pedal in your tow vehicle is a classic sign of air trapped in the lines.
It is a prevalent issue, especially after replacing components like brake lines or wheel cylinders.
Bleeding the brakes removes this air and restores proper hydraulic pressure and stopping power. While it can be fixed at home, following the appropriate steps will ensure the brakes are safe to use.
Tools You Will Need
- Someone who will help in the process
- Fresh brake fluid (check your manual for the correct type)
- A clear plastic hose
- A wrench that fits the bleeder valves
- A container to catch the old fluid
- Safety glasses and gloves
Step-by-Step Guide to Bleeding Trailer Brakes
1. Prepare the System
Ensure your trailer is on a level surface and securely chocked. Locate the master cylinder and fill it to the maximum line with fresh brake fluid. Do not let the fluid level drop below the minimum mark during the process.
2. Start at the Farthest Wheel
Bleeding should always begin with the brake assembly located farthest from the master cylinder. It is typically the rear passenger side wheel.
3. Bleed Each Wheel
With someone’s help, pump the tow vehicle’s brake pedal a few times until it feels firm. They should then hold the pedal down. Simultaneously, open the bleeder valve on the wheel cylinder with your wrench.
4. Watch for Air Bubbles
As you open the valve, fluid and air will come out of the hose, and you will see bubbles in the clear hose. When the fluid flow stops, or before the pedal hits the floor, close the bleeder valve. Your helper will have to release the brake pedal.
5. Repeat the Process
Repeat this pumping, holding, and releasing cycle on the same wheel until no more air bubbles appear in the fluid coming out.
6. Move to the Next Wheel
Once the first wheel is free of bubbles, move to the next farthest wheel and repeat the process. Continue this until all four brakes have been bled.
7. Check the Fluid Level
Throughout the process, regularly check the fluid level in the master cylinder and top it off as needed. Once finished, make sure the master cylinder is topped off and securely capped.
After bleeding the trailer brakes, test them slowly in a safe area to ensure they are functioning correctly before returning to the road.
How to Replace Trailer Brake Pads?
Another widespread instance is replacing the trailer brake pads. While the entire task might sound daunting, starting with the right tools and techniques has its benefits.
Here’s a step-by-step guide to replacing trailer brake pads the right way –
1. Gathering The Ideal Brake Pad Replacement Tools
Before you begin the replacement process, ensure you have all the necessary safety tools and essentials readily available. Here is everything you will need –
- Safety goggles and gloves
- New brake pads or shoes
- Brake drums or rotors (if needed)
- Brake cleaner and grease
- Adjustable wrench or socket set
- Jack and Jack stand
- Lug wrench
- C-clamp or brake caliper tool
- Wire brush
These are the necessities of a trailer brake replacement – ensure you have them all.
2. Prepare the Workstation
When planning to replace trailer brakes, ensure that the trailer is placed on a level platform, and the workstation is clean, safe, and well-lit. You will need sufficient space to move and access the various tools and brake components to replace them. Also, you must chock the wheels to prevent rolling before you lift them.
3. Lifting the Trailer
Use a durable jack to lift the trailer into place and support the frame with the jack stands. Before you crawl underneath, check if the entire thing is secure.
4. Remove the Wheel
Do not rush – start slowly, especially if you’re doing it for the first time. Use a lug wrench to loosen the lug nuts on the wheel. One done, set the four aside.
5. Inspect the Brakes
We have already discussed the various types of damage you may find within the brakes. Inspect it for wear and tear and check for worn-out or damaged brake pads. Check for signs of leakage or malfunctions in drums or the rotor.
6. Remove the Brake Assembly
Trailers typically have a brake assembly type, depending on the type of brake used: electric, hydraulic, or surge. Based on this, you may have to remove the drum or rotor to access the brake assembly. You will need the adjustable wrench or socket set to loosen the bolts that secure the assembly.
7. Replace the Brake Pads
Once there, you are ready to replace the old brake pads.
- If your trailer has a disk brake, carefully remove the old one and replace it with the new one. Use a C-clamp or brake caliper tool to compress the caliper piston before installation.
- For a drum brake pad, remove the springs and clips. Remove the old shoe and replace it with the new one. Ensure it is properly seated.
8. Clean It Up
Before reassembling, clean the brake components with the specified cleaner. Remove dirt, debris, and grease. Apply fresh grease to the touch points to prevent excessive friction or squeaking.
9. Reassemble the Brakes
Carefully reassemble all the trailer brake components. Ensure all the nuts and bolts are in place and tight. Every part must be aligned to maintain safety on the roads.
How to Test Electric Trailer Brakes?
Once all the previous steps are complete, you will have a new trailer brake system in place. However, whether yours is an electric brake or a surge one, it is vital to test all the components on a real road.
Take the trailer to a safe spot to test the brakes. Once you start driving, pay attention to the responsiveness and stopping distance of your vehicle. If everything feels new and in order, it is safe to hit the road.
That’s how easy it is to test trailer brakes when they are new.
Preventing Future Trailer Brake Issues
It is vital to maintain trailer brakes, firstly for safety and secondly to avoid expensive replacement. Proper maintenance is essential for a secure trailer life and cost-effective maintenance.
Here are a few steps you can take to prevent future trailer brake issues –
1. Maintain Clean Brakes
Old grease on the brake pads reduces the braking capability and leads to longer stopping distances. Excess grease attracts dirt, contaminates the pads, and can lead to leaks.
Avoid applying grease to caliper surfaces. Use brake cleaners to clean the components to avoid this residue buildup quickly.
2. Inspect Brake Lines Occasionally
In a hydraulic braking system, brake lines are a crucial part. With continuous usage and time, these lines tend to develop leaks. Make it a habit to inspect signs of leakage, like spongy brakes and other abnormalities.
3. Replace Brake Components When Necessary
Brake components are always under constant friction. So, even with utmost care, they are bound to wear and tear.
Be aware of the signs and take care of your safety.
4. Master Safe Driving
While you can take complete care of all the trailer parts, effective driving is crucial. Braking systems are a safety feature. So, enable speed control and avoid collision at all costs.
The safer you drive, the longer the trailer components will last.
Trailer Brakes Not Working – When To Call a Professional?
Effectively troubleshooting trailer brakes is possible with the right tools and technical knowledge. However, some problems may not be apparent beyond visual inspection. Some issues could be too critical to handle.
Here are some instances when you will need trailer brake experts –
- When the problem is visual, or you are unaware of it. Some trailer brake issues are complex than others.
- When you cannot figure out where the issue is arising, or what sound keeps coming from the wheels.
- Even with the proper steps and tools in place, you can lack confidence.
- When you are a beginner and do not have the right tools.
- When you do not want to try to fix this and worry about it later.
All Things Trailer with Top Shelf Trailers
Whether you are changing the brake pads or opting for a trailer brake controller installation, we can help with the right guides and an ideal professional.
As a leading trailer manufacturer in the United States, Top Shelf Trailers offers a premium collection of trailers tailored to both professional and recreational needs. Beyond trailers, you can take advantage of various high-quality components for essential upgrades and repairs.
Are your trailer brakes not functioning correctly? Consult with us for a professional trailer adjustment.
Frequently Asked Questions
1. What is the trailer brake gain setting?
A trailer brake gain setting indicates the amount of power required to apply to the trailer brakes for proper function. To adjust trailer brake gain setting, one must be mindful of safety, control, and the loads. Higher gains increase the braking force for heavy loads. Lower gains, on the other hand, prevent trailer brake lock-up.
2. What’s the difference between electric and hydraulic trailer brakes?
A trailer brake controller in the tow vehicle controls the electric brakes on the trailer. It uses electromagnets to activate the brakes.
Hydraulic brakes use fluid pressure to activate the brake components. They offer a smoother and more controlled brake mechanism.
3. Can I fix trailer brakes myself?
Yes, with the right tools and techniques, you can fix trailer brake problems at home. Be sure to follow proper guides.