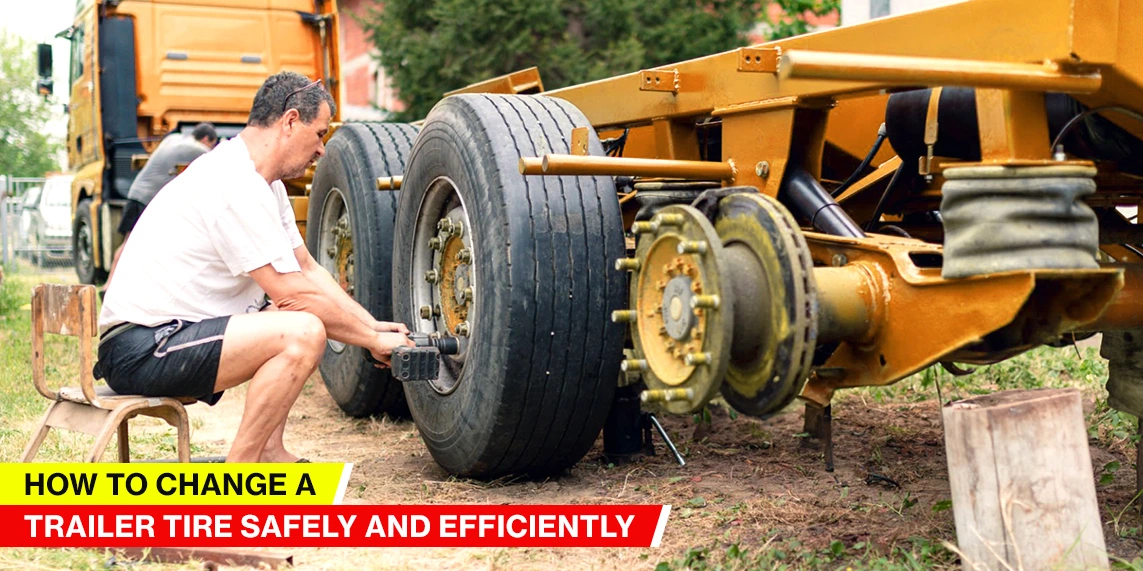
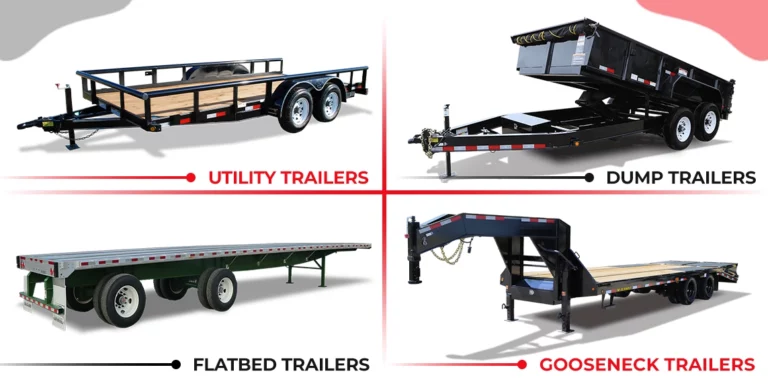
Flat tires on open roads are terrible. Driving a towing trailer with a heavy load is far more daunting.
So, what is the immediate remedy for flat tires? Mastering how to change a trailer tire!
Before we discuss changing trailer tires, let’s first understand some basics. Flat tires are inevitable, and even damaged ones are common these days.
Several factors contribute to it — weathering, accidental puncture, quality, etc.
As a professional trailer driver, learning to change tires is crucial. It prevents flat tires and protects the trailer from further damage. With the ideal tools and techniques, the process is straightforward. And you can have your trailer back on the roads in no time.
Without further ado, let us explore this comprehensive read on how to change a trailer tire. We will explore some of the most essential tools for a tire change. The goal is to help you master trailer care and maintenance without professional help.
When to Replace Trailer Tires?
An once-over assures a safe journey, even if your trailer is brand new. Trailer tires, for instance, are a vital touch point. Most professionals prefer a thorough trailer check, especially tires, for an optimum drive.
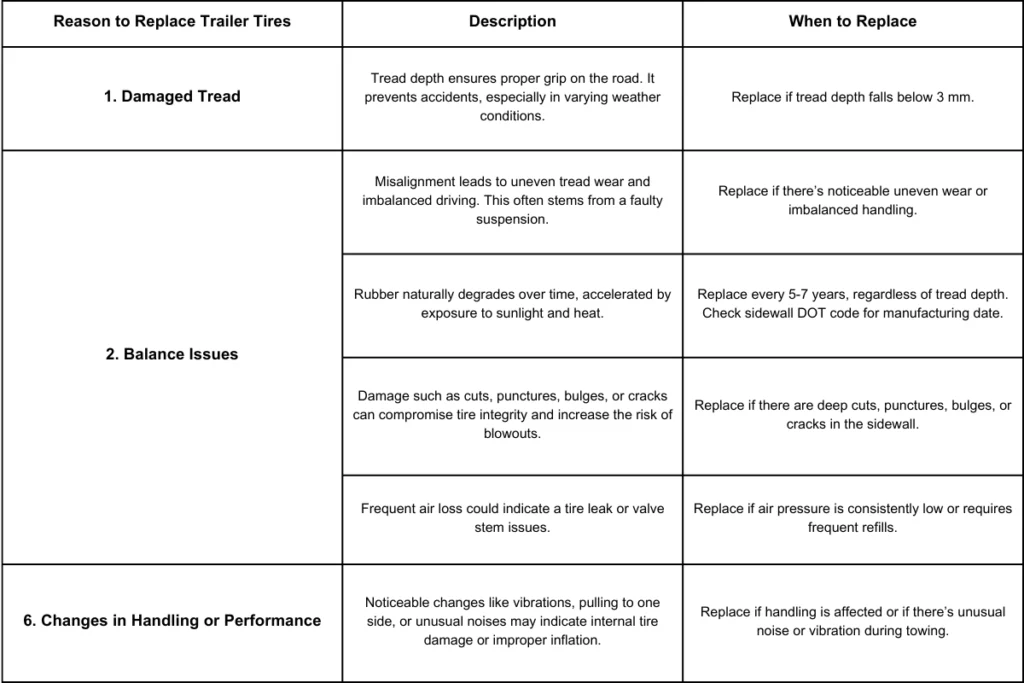
If you are wondering what possible reasons demand a tire change, let us have a look –
1. Damaged Tread
The tire’s tread depth, irrespective of the vehicle, ensures a robust grip on the road. In a perfect world, roads are silky smooth, and tread depth does not matter.
However, tire treads disperse the friction and establish the perfect grip. They ensure a safer journey on daunting roads and culminate in accidental possibilities.
The recommended trailer depth for high-functional trailers is 3 millimeters. This depth is ideal for safe driving in varied weather conditions, and we recommend checking it for driving security.
If the depth has reached below the 3 mm threshold, it is time to change the trailer tire.
2. Balance Issues
Drive alignment and balancing are directly linked to the wheels and tires. When dysfunctional, wheel alignment elevates tire wear and tear. This leads to uneven tread wear, creating an imbalanced driving experience. This entire impact is a result of a faulty car suspension.
So, if you have somehow ruined the tire alignment, it might be time to change the trailer tire.
3. Age
Rubber is the primary component of tires, irrespective of the vehicle type. It naturally degrades over time, along with tread wear. Furthermore, constant exposure to sunlight, heat, and environmental factors accelerates the process.
It is generally recommended to replace trailer tires every 5-7 years. This is applicable even if they have sufficient tread depth.
Check the tire sidewall for the manufacturing date. A DOT code usually indicates it and determines the tire’s age.
4. Visible Damage
We advise inspecting the tire regularly for visible damage, which can range from deep cuts to uneven punctures.
Deep cuts in the tire can compromise its structural integrity. Even small punctures lead to air leaks and potential blowouts.
Bulges or blisters indicate internal damage and should be taken seriously. On the other hand, cracks in the sidewall weaken the tire and increase the risk of failure.
Any signs of visible damage warrant a thorough inspection and require tire replacement.
5. Loss of Air Pressure
Frequent or unexplained loss of air pressure indicates a leak in the tire. The valve stem can also be a problem.
Continuously needing to add air to your tires is a sign of an underlying issue. It requires immediate attention.
If you suspect a leak, use soapy water to check for bubbles around the valve stem and tire sidewall to pinpoint the source of the leak.
6. Changes in Handling or Performance
Pay close attention to any changes in the trailer’s handling or performance. Increased vibration, pulling to one side and difficulty maintaining speed are plausible signs.
Unusual noises or sounds are also indicators of tire issues. These issues may range from uneven wear to improper inflation to internal damage.
If you notice any changes in handling or performance, have your trailer inspected. Always hire a qualified mechanic to diagnose the issue.
Stay aware of these instances and know when to change the trailer tire at the perfect moment. This will prevent further damage or elevated financial stress.
Essential Tools for Changing Trailer Tires
So, now that you know the exact tire-changing moments, let us talk about tools. With the perfect tool, the task has begun and is half done.
Additionally, the process becomes proficient, error-free, and suitable for varied locations. Let us explore the tools necessary when the question is how to change a tire on the trailer –
• Jack
Jacks are the most critical tool for a flat tire situation. They lift the vehicle in position, enabling access to the defective tire. With the clearance they provide, they become a crucial inclusion in long drives.
When purchasing the jack, ensure it supports the vehicle’s and trailer’s weight. The vehicle’s position must be secure before changing tires. This mitigates the chances of commonplace accidents.
While scissor jacks are standard, the hydraulic jack is ideal for trailers. It offers ease of use and durability for prolonged usage.
• Lug Wrench
Lug wrenches, also called tire irons, are used to tighten or loosen lug nuts to secure the wheel hub. They are available in numerous sizes to accommodate varied vehicles.
We recommend finding the perfect lug wrench designed for a trailer. Additionally, telescopic lug wrenches are becoming market-predominant. They offer that elevated leverage to tackle difficult nuts.
• Spare Tire
A trailer’s changing kit cannot be complete without a spare tire. Two variants are available: a full-size spare or a compact temporary tire called a donut.
A functional spare is easy to change and get back on the roads. It helps reduce the time gap and keeps the driving experience ideal.
Always check the spare tire pressure periodically to avoid carrying a damaged one in need. Taking care of the trailer tire spare is an individual task.
• Wheel Wedges/Chocks
A wheel chock is a popular wheel-shaped block placed against the wheel to prevent vehicle movement. They are used for safety purposes and parking brakes.
While wheel wedges are not mandatory, they are for safety purposes. They stop the trailer or vehicle from moving while you change the tire.
Remember, changing a trailer tire is a daunting task for a beginner. It never hurts to be extra cautious and avoid accidents.
• Flashlight
A flashlight is always a good idea when working on something critical. We do not suggest changing a tire in a poorly lit space. Several things might go haywire, and a mishap is always possible. For instance, lug nuts are critical to work with because of their minuscule size. Flashlights offer a sound and visible workspace.
Whenever changing a trailer tire, start with proper illumination. Choose a flashlight with good strength and cell capacity. It can also be weather-resistant for that extra reliability.
• Tire sealer
A tire sealer offers a convenient temporary solution for small punctures in trailer tires. The liquid or gel is injected into the tire, flows to the puncture site, and solidifies to create a temporary seal.
The method is quick and easy and ideal for minor punctures encountered on the road. However, it is crucial to remember that tire sealers are not a permanent solution.
They are ineffective for larger punctures and potentially affect tire balance and performance. Furthermore, their use may not be suitable for all types of tires.
Tire sealers can be a lifesaver in a pinch. However, a qualified professional must adequately inspect and repair the tire.
These are essentials in a tire-changing kit and are reliable for beginners. We suggest understanding how to utilize each in the next section. Changing trailer tires may not be daunting with the ideal tools and expertise.
Step-by-Step Guide to Changing a Trailer Tire
Changing a trailer tire does not need to be confusing. With proper preparation and a methodical approach, it is a manageable task.
This comprehensive guide will equip you with the knowledge to safely and efficiently handle this situation.
Let us begin –
1. Preparation is Key
Before you start, gather the necessary tools and supplies –
• Spare Tire:
Ensure your spare tire is properly inflated and in good condition. Inspect it for any signs of wear and tear, such as cracks or bulges.
• Jack:
It is crucial to have a hydraulic jack specifically designed for your trailer’s weight. For the correct jacking points, refer to your trailer’s owner’s manual.
• Lug Wrench:
Find a sturdy wrench that fits your trailer’s lug nuts. Avoid using a pipe extension on the lug wrench, as it can increase the risk of injury.
• Wheel Chocks:
These are vital for safety. Place chocks securely in front of and behind the wheels opposite the flat tire. It will prevent the trailer from rolling.
• Gloves:
Wear gloves to protect your hands from dirt, grime, and potential cuts.
• Safety Glasses:
Protect your eyes from flying debris or dirt.
• Torque Wrench (Optional):
It helps precisely tighten the lug nuts to the manufacturer’s specifications.
• Air Compressor or Tire Gauge:
Check and adjust tire pressure after installation.
• First-Aid Kit:
Keep a basic first-aid kit handy in case of minor injuries.
• Flares or Reflective Triangles:
If changing the tire on a roadside, use flares or reflective triangles to warn approaching traffic.
2. Removing the Flat Tire
• Safety First:
Engage the trailer’s parking brake. It is a hassle-free safety measure for a safe tire change.
• Loosen Lug Nuts:
Using the lug wrench, loosen the lug nuts on the flat tire by turning them counterclockwise. Avoid removing them entirely at this stage. The step is crucial to prevent the wheel from spinning freely when the tire is lifted.
• Position the Jack:
Carefully position the jack under the trailer frame at the designated jacking point. The correct location is in your trailer’s owner’s manual.
• Raise the Trailer:
Slowly and steadily raise the trailer using the jack until the flat tire is completely off the ground.
• Remove Lug Nuts:
Completely remove the lug nuts once the tire is off the ground.
• Remove the Flat Tire:
Carefully pull the flat tire off the wheel hub.
3. Installing the New Tire
- Mount the Spare Tire: Align the new tire with the wheel studs.
- Install Lug Nuts: Hand-tighten the lug nuts in a star pattern (opposite nuts) to ensure even pressure distribution.
- Lower the Trailer: Slowly lower the trailer using the jack until the tire is back on the ground.
4. Tighten Lug Nuts
• Without Torque Wrench:
Use the lug wrench to tighten the lug nuts in a star pattern. Apply firm, consistent pressure to ensure they are securely tightened.
• With Torque Wrench:
Tighten the lug nuts to the manufacturer’s recommended torque specifications. Refer to your trailer’s owner’s manual or the tire manufacturer’s guidelines.
• Remove Jack:
Carefully remove the jack from under the trailer.
• Check and Adjust Tire Pressure:
Inflate the new tire to the recommended pressure specified on the tire sidewall or in the manual.
5. Tire Sealants: A Temporary Solution
Tire sealants are a quick-fix solution for minor punctures, such as nail penetrations. They are typically self-sealing liquids or gels that are injected into the tire. When the tire rotates, the sealant spreads and seals the puncture.
Pros of a Tire Sealant –
It is quick and easy to use and can be used on the road without removing the tire.
Cons of a Tire Sealant –
It is not a permanent solution and may not be effective for larger punctures. It can also affect tire balance and performance and is unsuitable for all tire types.
6. Post-Change Inspection
• Re-check Lug Nut Tightness:
After driving a short distance, stop and re-check the tightness of the lug nuts.
• Monitor Tire Pressure:
Regularly check tire pressure for any signs of leaks or pressure loss.
Follow these steps and prioritize safety. With the ideal steps, you can confidently handle a trailer tire change and get back on the road.
Some Safety Considerations –
- Always wear appropriate safety gear and avoid working under a raised trailer. We recommend using a stable and properly positioned jack.
- Be aware of your surroundings and traffic. If you are unsure about any aspect of the tire change, consult a qualified mechanic.
- Refer to your trailer’s owner’s manual for specific instructions and recommendations. Always prioritize safety and consult with a qualified mechanic if you have any doubts or encounter any difficulties.
Tips for Changing Tires on Specific Trailer Types
Changing a tire varies significantly depending on the trailer type. They require different techniques and considerations for safety and efficiency.
Here is a breakdown of key factors for different trailer types –
• How to Change a Small Trailer Tire
Small trailers often have more accessible tires, making the process relatively straightforward. We recommend using a compact jack to reach the appropriate jacking points.
In a small trailer, the lug nuts are usually easier to access and tighten, and the tire is generally easier to change and handle.
• How to Change a Tire on a Utility Trailer
Ensure that a utility trailer is properly leveled and that the weight is evenly distributed. These checkpoints before jacking prevent instability during the tire change.
If the trailer is heavily loaded, consider removing some weight to make the tire change more manageable and safer. We suggest locating the designated jacking points on the trailer frame.
Utility trailers often have larger tires, which can be heavier to handle.
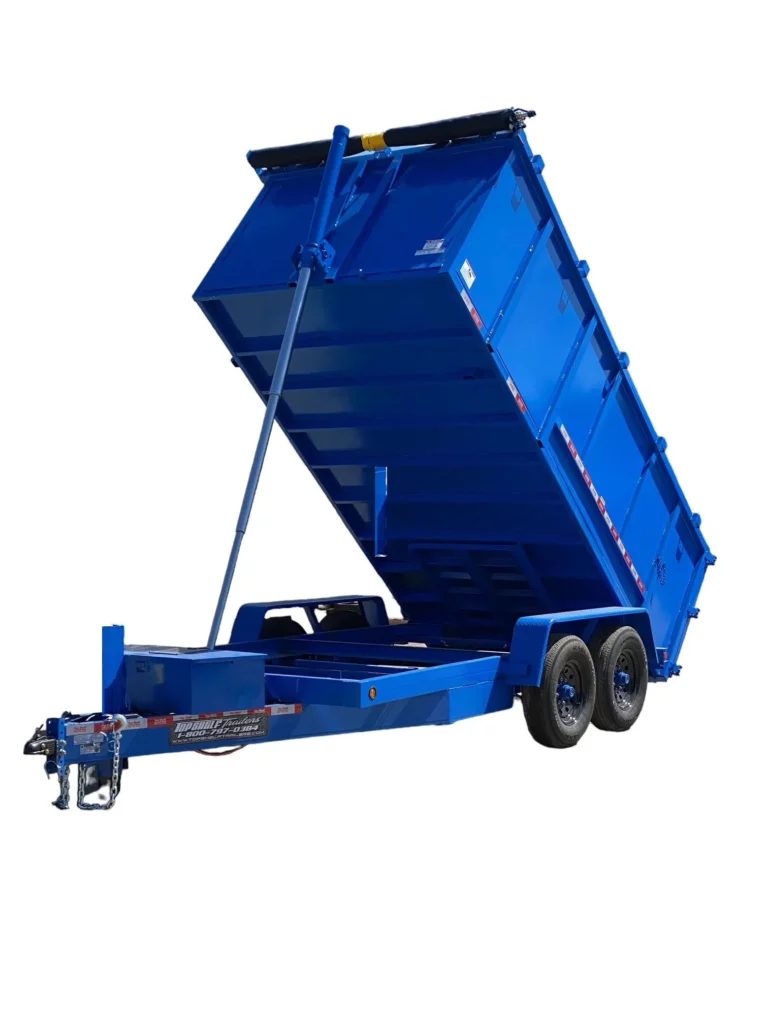
• How to Change a Tire on a Dump Trailer
Prioritize safety by ensuring the dump bed is securely locked in the down position. This crucial step prevents accidental dumping during the tire change. Remember, with precaution, it may have catastrophic consequences.
Use caution when jacking a dump trailer, as the weight distribution can shift. Dump trailers typically have larger tires to support heavier loads.
• How to Change a Tire on a 5th-Wheel Trailer
Ensure the 5th wheel connection is secure to prevent the trailer from rocking or shifting during the tire change. It is vital for maintaining stability and preventing accidents.
In terms of jacking, we suggest heavy-duty jacks designed for the weight of the fifth-wheel trailer. Fifth-wheel trailers have large tires to support the weight of the RV.
We highly recommend getting professional assistance. A fifth wheel is larger, heavier, and more complex. Therefore, professional support is advisable for tire changes, especially if you are a beginner.
• How to Change a Camper Tire or Flat Tire on an RV Trailer
With RV, accessibility is a challenging factor. The size and design make it difficult to reach the tires. We recommend using a sturdy jack that can lift the heavy weight of the RV.
Furthermore, RV tires are typically large and heavy. If you are uncomfortable changing the tire, consider consulting a qualified RV repair shop.
General Tips for All Trailer Tire Changes –
- Refer to your trailer’s owner’s manual. The manual provides specific instructions and safety guidelines for your particular trailer model and will ensure you follow the correct procedures.
- Wear appropriate safety gear: Always wear gloves and safety glasses to stay protected from potential hazards.
- Work in a well-lit area: Adequate lighting is essential for visibility and accuracy during the tire change.
- If you are unsure about any aspect of the tire change, consult a professional mechanic. They can provide expert guidance and assistance, ensuring the job is done correctly and safely.
Remember to prioritize safety and consult with a qualified mechanic if you have any doubts or encounter any difficulties.
Tips for Trailer Tire Replacement and Maintenance
Proper trailer tire maintenance is crucial for safety, fuel efficiency, and lifespan extension. Similarly, neglecting tire health care can lead to premature wear. They become prone to blowouts and costly repairs.
Here is a detailed, expert-backed guide to help you keep your trailer tires in top condition –
1. Tire Selection and Replacement
Select tires specifically designed for your trailer’s intended use and weight capacity. Consult your trailer’s owner’s manual for recommended tire sizes and load ratings.
2. Consider Tire Type
Choose the type that best suits your needs and driving conditions. There are two popular options in the market –
- Radial tires: Offer better fuel efficiency and a smoother ride.
- Bias-ply tires: Durable but may offer a harsher ride.
3. Replacement Timing
We discussed the opportune moments of changing the tire. Here is a quick recap –
• Age:
Replace tires every 5-7 years, regardless of tread depth, as rubber degrades.
• Tread Depth:
Regularly inspect the tread depth. The minimum legal tread depth varies by region, but 3 mm is a common trailer standard. Use a tread depth gauge for accurate measurements.
• Wear Patterns:
Uneven wear patterns (e.g., feathering, cupping) indicate potential alignment issues or improper inflation.
• Damage:
Replace tires with any signs of damage, including cuts, punctures, bulges, or sidewall cracks.
• Matching Tires:
Always replace tires in pairs or sets to maintain proper handling and prevent uneven wear.
4. Tire Pressure Maintenance
Accurate pressure ensures prolonged tire usage and a safer drive experience –
• Regular Checks:
Check tire pressure monthly before and after long trips. Use an accurate tire pressure gauge.
• Proper Inflation:
Maintain the recommended tire pressure specified in your trailer’s owner’s manual or on the sidewall.
• Under-inflation:
Underinflated tires increase rolling resistance. It can lead to decreased fuel efficiency and increased tire wear. They also increase the risk of overheating and blowouts.
• Over-inflation:
Overinflated tires can lead to a harsher ride, decreased traction, and increased susceptibility to punctures from road debris.
5. Tire Inspections
Conduct thorough visual inspections of your tires regularly, checking for –
- Cuts and punctures: Look for foreign objects embedded in the tire.
- Bulges or blisters: These indicate internal damage.
- Cracks or tears: Check for cracks in the sidewalls or tread.
- Uneven wear patterns: Observe the wear patterns on the tread to identify potential issues.
- Tread Depth: Use the penny test to quickly check tread depth. The tread depth is likely below the recommended minimum if you can see the top of a penny inserted into the tread groove.
6. Tire Rotation
Rotating tires helps ensure even wear and extends their lifespan. Check for –
- Frequency: Rotate tires according to the manufacturer’s recommendations, typically every 5,000-8,000 miles.
- Rotation Patterns: Follow the recommended rotation pattern for your specific trailer.
7. Storage Considerations
If your trailer is in storage for extended periods –
- Inflate tires to the recommended pressure to prevent flat spots.
- Store the trailer in a superb, dry, shaded location to minimize tire degradation.
- Consider using tire covers to protect tires from UV rays and environmental damage.
- For short-term storage, regularly check tire pressure before going on the roads.
8. Professional Maintenance
Optimum balance offers a smooth trailer ride. It involves –
- Wheel Alignments: Regular wheel alignments are crucial for even tire wear and optimal handling.
- Tire Balancing: Unbalanced tires can cause vibrations and premature wear. Have your tires professionally balanced as needed.
9. Load Management
Effective load distribution once again offers a longer tire shelf life –
- Avoid Overloading: Overloading your trailer can significantly impact tire wear and increase the risk of blowouts.
- Proper Load Distribution: Distribute the load evenly within the trailer to prevent excessive stress on any single tire.
10. Driving Habits
Keep these safety habits in check for elevated trailer and tire experience –
- Avoid Sudden Maneuvers: Sudden acceleration, braking, and cornering can stress tires excessively.
- Smooth Driving: Maintain a consistent speed and avoid aggressive driving techniques.
With these techniques, you can significantly extend the lifespan of your trailer tires. This expert advice will also improve safety and enhance your overall towing experience. Consult your trailer’s owner’s manual and seek professional advice when necessary.
Finding Authentic Trailer Essentials at Top Shelf Trailers
The ideal techniques are crucial for handling replacement trailer tires. However, you must also know how to maintain the trailer and its tire quality.
It can save you from numerous critical situations, like being stranded in unknown places with a flat tire. However, with this comprehensive read, you can now effectively learn how to change a trailer tire.
For more details on dump trailers and how to maintain them, explore Top Shelf Trailers. Here, you can find some of the best-rated trailers in the market, as well as tire essentials. Our trailer experts can provide the ideal resources and find the best trailer parts for your needs.
Get back on the road with the perfect tire-changing skills. For further guidance on trailer tire changes, consult the best trailer manufacturers in the United States.

